Went back to " X'mas Toy Galore " at Kallang Leisure Park again and bought more stuff... has spent over $270 already, hahahaha... think is to compensate for the less frequent warehouse sale these 2 years... hahahaha... anyway, gotten mostly repeated stuff as presents for my little nephew and niece. For my little niece, I got her a Figuarts bear thing (SGD30), and a Triple Change Henshin Belt Vol 2 (SGD20), as she previously mentioned she does not have a proper Kamen Rider belt... hahahaha... now the 3 of us can henshin together into KR Kabuto(s)... "お母ちゃんが言っていた..." ... hahahaha... Gotten my little nephew a DX Ryu Tsueider (SGD30) as he likes dragon related stuff after being hooked onto 'Dragon Ball Super', and also a DX Houou Blade and Houou Shield (SGD38) (which I also gotten 1 for myself too) ... Now got to find places for my displays!!!!
Also bought this PlaMonster Blue Unicorn (SGD3) again as the previous one will be given to my little niece as she likes unicorn stuff...
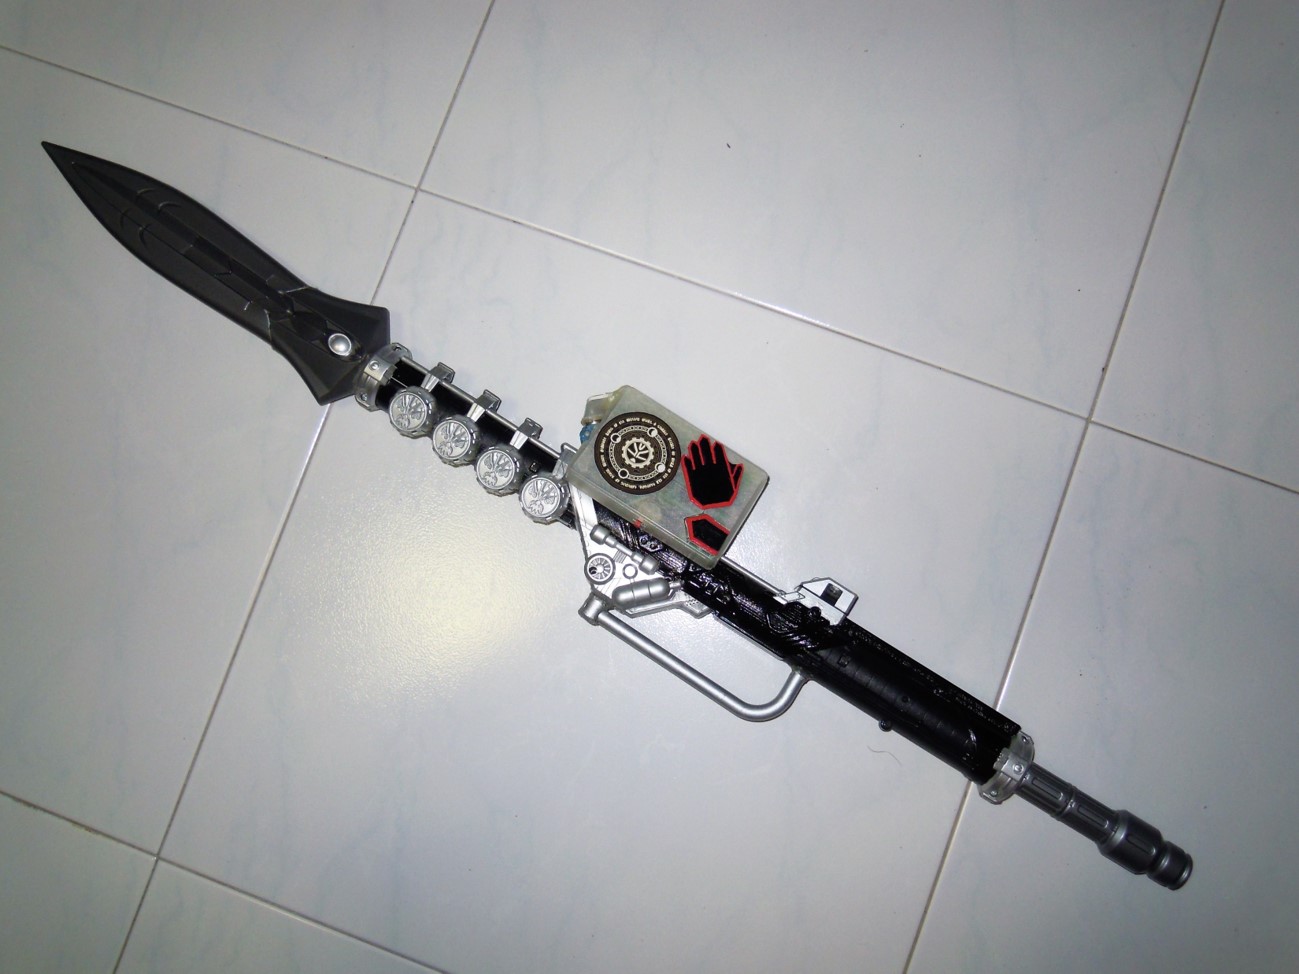
Used a Halloween toy axe bought from Daiso to extend the staff portion of the DX RyuTsueider. Might seem to be a little long due to the small dragon head making the proportion look weird. However, the length suits me just fine to just slightly bend and slam the Ryu Tsueider on the ground to "transform", hahahaha...
All parts are hot glued. Actually, the original length looked quite good in rifle mode but was way too short in staff mode, hence my modification cause...
And if desired, the alternate rifle mode with a shorter barrel length can be achieved by removing the middle piece (screw-threaded) ...
A size comparison of the modified DX Tsueider and the DX WizarSwordgun...
Bought these at the "X'mas Toy Galore" at Kallang Leisure Park... Also bought a DX Beast Driver, a DX Dicesaber and a DX Mirage Magnum (not in picture) at $10 per piece to store...
A surprise find, as I had always wanted to get the Showa belts... and they cost only $20 a piece.. Will be displaying with the KR Stronger and KR Black buckles for these 2 belts... unfortunately there is no Vol 1 (which has the Amazon buckle)... May go back again to get 1 more for my little niece...
Could not resist this as it is at a very low price... DX Zyuoh The GunRod... $20...
Not know why I bought this DX Kyutama SP Set... Costs $8... but should be a good display set...
Bought this DX Kyu The Weapon at $30, for my little nephew this time...
And a Figuart My Melody Pink for my little niece at $20...
Carried out a 2-day operation to restore my cheapo KO DX Orb Calibur using a 2nd-hand DX Orb Calibur's circuit. Works around 90%, as all features are available, except for the elemental selection is not stable, as can be seen in the clip where some elemental modes "skip" fast to the next. Also the spinning of the orb is not smooth, needs an average of about 2 spins to get to the transformation mode or supreme calibur mode . Nevertheless, I am very happy that this is done!
First, "trim and fit" the NFC (or whatever technology) chip to fit into the middle-holders... Nearly threw away this chip as I did not know then that there is a "联动" between the Orb Calibur and the Orb Ring... Lucky...
Next to restore is the spinning gimmick. Took a long time than estimated as the structure of the KO is entirely different from the DX, hence the KO parts cannot be made to functionally-work with/same as the DX circuit, and many spaces have to be made by cutting off the existing plastics... One of the parts that did not work that well is the spinning tab on the ring part itself to activate the switch when the ring part is rotated, as I just lazily used hot glue to form the tabs... anyway, somewhat can work so will have to be thankful, hahahahaha...
The KO has the display for the 4 elemental modes in colour, which makes it looks nicer than the DX version when displayed (in my opinion). But to make it light up, well... possible but my laziness in hesitating in removing the clear top plastic cover nearly ruin the display while drilling the holes for the LED lights to pass through... In the end, I break the locking clips of the top clear cover to cut big holes on each elemental mode logo to allow the light to properly shine through...
Have to also make shades for the lights not to seep through into the neighbour... hahaha...
The circuit from the 2nd-hand X version is "transplanted" into the KO body... Hot glue is indeed my best friend... currently...
The trigger has to be restored too as the KO one is remolded to be mounted onto a slide switch... Lots of trimming and cutting and trial and error...
Finally done!!! Also touch up the paint job as best as I can (actually I am very very lazy and tired at this point, hahahaha... ) ... It works, albeit the elemental mode switching is a bit cranky... I am more than happy already... In fact, after filming the demo clip, I still continue to do some adjustment by loosening some screws to see if I can get a better spin control... A bit of success, not much, but hey I will not be complaining... hahahaha...
Here's a quick demo or the end results, and I borrowed my little nephew's DX Orb Ring for the scanning feature...
I bought a cheap (?) gashapon Harinezumi ( Hedgehog ) fullbottle which had a wrong cap, and intent to give it to my little nephew, when I realised I had actually bought the DX Drill Crusher and it comes with a DX Harinezumi ( Hedgehog ) fullbottle. So I decided to modified it to be a Shobosha ( Fire Engine ) fullbottle which will be a pair of "Best Match".
I used a thick ABS sheet (cannot remember how many mm) to cut out a thin strip and then cut to the required shape and size to super-glue on as tabs, and un-needed tabs are cut off using a pair of small wire-cutters. Red marker is used to colour on the inside of the full bottle to give it a transparent red effect. Finally made a sticker to paste onto the cap. Decided not to colour the cap as the metallic effect looks very nice.
Identical pair of "Best Match" fullbottles, hahahaha...
Loose DX Ninja and Comic Full Bottles... for my little nephew... I have to believe the seller's claim that they are brand new... Really hope so... hahahaha... hygiene freak... Cost about SGD 18.45 .....
And initially I thought this is another lion kyutama, and totally miss out Shishi Red a.k.a. Lucky's helmeted face on the product website... sigh... oh well, just hope I will get lucky after getting this "Lucky"... hahahaha... Costs about SGD 4.80 ....
Also another long long overdue project... And shockingly realized all my pictures taken during the earlier work-in-progress are gone... wait.. did I take pictures then?! hmmm... really cannot remember...
Anyway, it is done, this is the memory side of this power-up "adapter(??!!)" thing... hahaha... Sticker is also bashed from images from the internet... I don't have a white/transparent DX gaia memory so have to make do with this blue colour one...
I simply stuff everything (the circuit of the DX Axcalibur actually) inside a plastic card holder and pasted translucent plastic pieces (that was previously a notebook cover) onto it using double-sided tape, knowing that spray paint will probably not adhere to the surface well... The white wizard magic pattern is "borrowed" from the internet search, and the "thumb" and "hand" are made from ABS sheet and then painted with a paint pen, hence the shoddy worksmanship (not to mention I was also watching my favourite variety show then as well, hahahaha...) ...
As I am using the battery compartment of the gaia memory, I have to think of a way to let the cover be accessible... In the end, use a hinge to allow the gaia memory to swing out to access the battery cover, and 2 magnets to hold them in place... But this actually leads to the sensing function of the circuit to be hay-wired, as the "turn-on!" feature will occasionally be activated by itself... hahahaha...
Slotting into the Hamel Cane!!!! It may look like it is so easy for me to do all these.. but in reality, I had to ideate, try, and fail, umpteen times before something workable appears, and often more, failures that are not documented... But without these experiences, good or fail, I am almost certainly unable to do anything at all... So I always believe that one should just go ahead and try out any bashing, customizing, etc etc, instead of asking for the most detail of the details, so much so that if one just go ahead and try it out, he/she will know the answer him/herself... And to me, that is also one of the fun factor in restoring, modding, bashing, or customizing... Just go and try!!!! And have fun at the same time!!!!
Normal attack without "turn on!" will only light up the red LED...
... and it really looks much better in "person" than in picture for the 4 glowing colour lights diffusing out through the translucent plastic and double-sided tape...
Version 1 was spoilt a long long time ago, so decided to make a new one instead of repairing it.. This time, wanted to make a more movie accurate version, so tried out using ABS sheet bought from Taobao.com... Parts are then glued with superglue which works surprisingly well on ABS... Hot glue is then used to reinforce the joints and seams...
This is the gaia memory holder...
.. and the switch to activate the "Upgrade!" sound when the gaia memory is inserted...
Used 2 expensive sound circuits, which are not the usual mic-record versions I normally used, but they are the type that has ports to transfer sound files from computer into them. They are used as my normal sound recording circuits somehow are unable to capture the "upgrade!" and "booster!" properly...
Details are only done on the front face, using mostly spare parts and other other objects found here and there, as long as the shapes resemble... A layer of PVA glue is applied on the oilier plastics in case the spray paint cannot adhere to the surface...
Spray painted with a few types of silver paint and in the end the last coat chosen was silver chrome, and fortunately, the chrome did not come too reflective, else the whole gaia memory enhancing adapter will look too shiny...
Font face of the adapter...
The back of the adapter is the battery compartment with magnets to held close in position...
The opening for the gaia memory is too big after I scrape the paint off the edges...
... and so I tried adding some sponge to thicken up... but the original thickness was too much and the gaia memory became hard to put in. Then I tried to slice the sponge to half thickness but this time, the gaia memory fits in ok, but still loose as when I try to hold it when pulling it out together with the gaia memory from the Driver, it will come out with the gaia memory still stuck in the Driver... sigh... will probably touch up next time, when I have the motivation again...
And here it is with the DX Accel Gaia Memory in it... Theoretically it should work on all gaia memories, though I have not yet tried it...
Looks good... much better than the previous one... hahahaha...